Friday, January 31, 2025

trap bar deadlift

trap bar deadlift

Trap Bar Deadlift:


A Safer and More Effective Way to Lift Heavy The trap bar deadlift is a popular variation of the conventional deadlift that utilizes a hexagonal (trap) bar instead of a straight barbell. This design allows lifters to stand inside the bar, which creates a more natural lifting position. It’s widely used by athletes, beginners, and even advanced lifters because it reduces stress on the lower back while still targeting major muscle groups.

Muscles Worked in a Trap Bar Deadlift Like the traditional deadlift, the trap bar deadlift is a compound movement, meaning it works multiple muscles at once: Quadriceps (Quads): The trap bar deadlift shifts more emphasis to the quads compared to a regular deadlift.

Glutes & Hamstrings: These muscles power the hip extension and drive the lift. Lower Back & Core: Help stabilize the spine and maintain good posture. Upper Back & Traps: Work to keep the shoulders retracted and the bar under control. Forearms & Grip Strength: Improve by holding onto the handles throughout the lift.

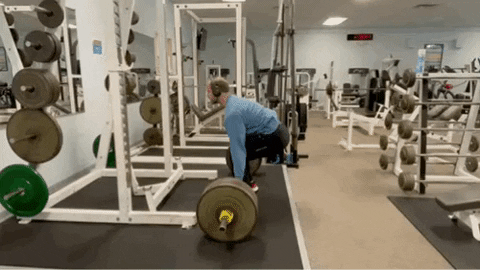
How to Perform a Trap Bar Deadlift Correctly Set Up the Trap Bar: Load the bar with appropriate weight and stand in the center of the hexagonal frame. Foot Position: Keep your feet hip-width apart, with toes pointing forward or slightly outward.

Grip the Handles: Bend at the hips and knees, keeping your chest up. Grab the neutral (parallel) handles firmly. Engage Your Core: Brace your abs and pull your shoulders back to maintain a straight spine

. Lift the Bar: Drive through your heels and extend your hips and knees at the same time to lift the weight. Keep your back straight. Lockout Position: Stand tall with your shoulders back, chest up, and hips fully extended.

Lower the Bar: Reverse the movement by pushing your hips back first, then bending your knees, and slowly lowering the bar under control. Why Choose the Trap Bar Deadlift?

Reduced Lower Back Strain: Unlike the conventional deadlift, the trap bar places less stress on the spine because the weight is centered around your body rather than in front of you. Easier on the Joints: The neutral grip and upright torso reduce strain on the shoulders and lower back, making it a safer option for beginners and those with back issues. More Quad Activation: Since the movement is more similar to a squat, it engages the quadriceps more than a regular deadlift.

Improves Athletic Performance: Many athletes prefer trap bar deadlifts because they closely mimic jumping and sprinting movements, improving overall power. Better Grip Strength: The higher handle position makes it easier to hold the bar, making it great for lifters who struggle with grip.

Common Mistakes to Avoid Lifting with a Rounded Back: Keep your spine neutral throughout the lift. Not Engaging the Core: A weak core can cause instability and potential injuries.

Standing Too Far Forward or Back: Ensure you’re properly centered inside the bar. Pulling with the Arms: The power should come from the legs and hips, not the arms. Trap Bar Deadlift vs. Conventional Deadlift

Feature Trap Bar Deadlift Conventional Deadlift Back Strain Lower Higher Quad Activation Higher Lowerv

Grip Position Neutral Overhand/Mixed Difficulty Level Easier Harder

Best For Beginners, Athletes, Lifters with Back Pain Powerlifters, Strength Enthusiasts Final Thoughts

The trap bar deadlift is a fantastic alternative to traditional deadlifts. It offers similar strength-building benefits while being easier on the back and joints. Whether you’re a beginner looking for a safer way to lift or an athlete aiming to improve power and explosiveness, incorporating trap bar deadlifts into your routine can be a game-changer!

Wednesday, January 29, 2025

overhead press

The overhead press,


How to Perform the Overhead Press Setup:


Stand with feet shoulder-width apart and grip the barbell slightly wider than shoulder-width. Keep your wrists straight, elbows slightly forward, and the bar resting on your upper chest. Engage your core and keep your back neutral. Pressing Phase:

Take a deep breath and press the bar upward in a straight line. Fully extend your arms at the top, keeping the bar directly above your head. Avoid excessive leaning or arching of the lower back.

Lowering Phase: Slowly bring the bar back down to your upper chest in a controlled manner. Keep your elbows slightly forward and avoid dropping the weight too fast. Repeat:

Perform the desired number of repetitions, maintaining good form throughout. **Muscles

Monday, January 27, 2025

Shoulder exercises (feel load)

Shoulder

A decline push-up is a variation of the standard push-up where your feet are elevated on a surface, such as a bench, chair, or step, while your hands remain on the ground. This increases the difficulty and targets the upper chest, shoulders, and triceps more intensely.

How to Perform a Decline Push-Up: Setup: Find a sturdy surface to elevate your feet (e.g., a bench, step, or low platform). Place your feet on the elevated surface and your hands on the floor, slightly wider than shoulder-width apart. Keep your body in a straight line from your head to your heels. Execution:

Lower your chest toward the ground by bending your elbows, keeping your core tight and your back straight. Stop when your chest is just above the floor or as far as your range of motion allows. Push through your palms to return to the starting position.

Form Tips: Keep your head in line with your spine; avoid looking up or letting your head drop. Engage your core to prevent your hips from sagging or rising. Move slowly and control the motion to maximize muscle engagement

Benefits: Targets the upper chest and shoulders more than standard push-ups. Builds core stability as the elevated position requires additional balance. Increases overall strength and muscle definition in the upper body.

Modifications: To make it easier: Decrease the height of the surface where your feet are elevated. To make it harder: Increase the elevation or add a weighted vest for more resistance. Would you like tips on how to incorporate decline push-ups into your workout routine?

The decline push-up is an excellent shoulder-loading exercise because the angle created by elevating your feet shifts more of your body weight forward onto your shoulders. Here's how it specifically affects the shoulders and increases the load: Shoulder Load in Decline Push-Ups: Body Angle Effect: Elevating your feet places your body at a downward angle, which causes more weight to be transferred to your shoulders. The steeper the decline (higher elevation of your feet), the greater the load on your shoulders.

Muscle Engagement: While the chest (particularly the upper chest) is the primary muscle activated, the anterior deltoids (front part of the shoulders) play a major role in stabilizing and pressing your body upward. Your trapezius and rotator cuff muscles also activate to provide stability to the shoulder joint. Strength Development:

Decline push-ups mimic a movement pattern similar to an incline bench press or handstand push-up, which is more demanding on the shoulders than standard push-ups. This increases shoulder strength and endurance over time.

How to Maximize Shoulder Load: Increase Decline: Use a higher elevation for your feet (e.g., a high bench or box) to emphasize the shoulders further. Shift Weight Forward: Slightly lean forward as you lower your body, mimicking a pike push-up position, to place even more focus on the shoulders.

Slow Eccentric Motion: Lower yourself slowly (about 3-5 seconds) to enhance the tension on your shoulders throughout the movement. Exercise Benefits for Shoulders: Builds strength and size in the deltoids. Improves stability and mobility of the shoulder joint. Prepares your body for advanced shoulder exercises like handstand push-ups.

Sunday, January 26, 2025

shoulder exercises

Best Shoulder Exercises for Strength and Stability

Shoulder exercises are essential for building strength, improving stability, and enhancing overall upper-body functionality. The shoulders consist of three major muscle groups: the anterior (front), medial (side), and posterior (rear) deltoids. Here are some of the best exercises to target all parts of your shoulders effectively:

1. Overhead Press (Barbell or Dumbbell) The overhead press is a compound exercise that targets the entire shoulder region, especially the anterior and medial deltoids. Use a barbell or dumbbells to press the weight upward from shoulder level while keeping your core engaged. This movement builds strength and promotes shoulder stability.

2. Lateral Raises Lateral raises focus on the medial deltoids, helping to widen and define the shoulders. Hold a dumbbell in each hand and lift them to the sides until they reach shoulder height. Ensure a slight bend in your elbows to reduce strain.

3. Front Raises This isolation exercise targets the anterior deltoids. Use a dumbbell or plate, raising it in front of you to shoulder level. Perform the exercise slowly to maintain control and maximize engagement.

4. Rear Delt Fly The rear delt fly strengthens the posterior deltoids, which often get overlooked. Lean forward slightly with a dumbbell in each hand, and lift your arms out to the sides like wings. This exercise improves posture and shoulder balance.

5. Arnold Press Named after Arnold Schwarzenegger, this exercise combines rotation with pressing to target all parts of the deltoids. Start with dumbbells at shoulder height, palms facing you, and rotate your wrists outward as you press upward.

6. Face Pulls Using a cable machine or resistance band, pull the handles toward your face, keeping your elbows high. This exercise targets the rear deltoids and promotes shoulder stability.

Incorporate these exercises into your routine 2–3 times per week for balanced, strong shoulders. Always prioritize proper form and warm up to prevent injury.

GIF

Friday, January 24, 2025

wrist pain exercies

wrist pain exercies

Wrist pain can occur due to overuse, injury, or strain from repetitive movements. To relieve pain and improve strength and flexibility, you can try simple wrist exercises. These exercises are easy to do at home and can help reduce discomfort over time.

1. Wrist Stretch: Stretch your arm out straight with your palm facing down. Use your other hand to gently pull your fingers back toward your body until you feel a stretch in your wrist. Hold this position for 20-30 seconds, then switch to the other wrist.

2. Wrist Flexor Stretch: Extend your arm with your palm facing up. Gently pull your fingers back with the opposite hand until you feel a stretch on the underside of your forearm. Hold for 20-30 seconds and repeat on the other side.

3. Wrist Rotations: Extend your arms forward and make a loose fist. Slowly rotate your wrists in circles, first clockwise and then counterclockwise. Perform 10 rotations in each direction to loosen up the joints.

4. Tendon Glides: Start with your fingers fully extended. First, curl the tips of your fingers to form a hook shape. Then, make a full fist. Open your hand back to the starting position. Repeat this exercise 10 times for each hand.

5. Wrist Curls: Rest your forearm on a flat surface with your hand hanging off the edge, holding a light weight or resistance band. Curl your wrist upward, then slowly lower it back down. Perform 10-15 repetitions on each hand.

These exercises are designed to relieve tension and build strength in your wrists. Do them regularly, but stop if the pain increases. If the pain persists, consult a doctor or physical therapist.

Wednesday, January 22, 2025

triceps exercises in gym

Triceps exercise

Triceps Exercises in the Gym

Tricep Pushdowns (Cable Machine)

Stand facing the cable machine with a straight bar or rope attachment. Keep elbows close to your body and push the bar/rope downwards until your arms are fully extended. Focus on squeezing your triceps at the bottom. Close-Grip Bench Press

Use a barbell on a bench. Grip the bar with hands shoulder-width apart. Lower the bar to your chest and press upward, focusing on tricep engagement. Dumbbell Tricep Kickbacks

Hold a dumbbell in each hand, hinge forward at the hips, and keep your back straight. Bend elbows to 90 degrees and extend them backward until arms are fully straight. Overhead Tricep Extension (Dumbbell or EZ Bar)

Hold a dumbbell or EZ bar with both hands and extend it overhead. Bend your elbows to lower the weight behind your head, then straighten your arms to return to the starting position. Skull Crushers (Lying Tricep Extensions)

Lie on a bench and hold an EZ bar with arms extended over your chest. Lower the bar to your forehead by bending your elbows, then push it back up. Dips (Bodyweight or Machine)

Use parallel bars or a dip machine. Lower your body by bending your elbows and push back up to engage the triceps. Diamond Push-Ups

Get into a push-up position with hands forming a diamond shape under your chest. Lower your chest to the floor and push back up. These exercises target all three heads of the triceps, helping to build strength and definition. Focus on proper form to avoid injury!

Tuesday, January 21, 2025

list of cardio exercise in home

List of Cardio Exercises in the Gym

Cardio exercises are essential for improving cardiovascular health, burning calories, and enhancing endurance. Gyms offer a variety of cardio machines and workouts tailored to different fitness levels. Here's a breakdown of popular cardio exercises in the gym:

Treadmill Running or Walking The treadmill is one of the most versatile cardio machines. You can adjust the speed and incline to simulate walking, jogging, or running uphill. It helps burn calories and strengthens the lower body.

Elliptical Trainer This low-impact machine combines upper and lower body movements, making it ideal for those with joint issues. It simulates walking or running without putting stress on the knees or hips.

Stationary Cycling Bikes come in upright and recumbent designs, allowing users to focus on leg muscles and cardiovascular endurance. High-intensity interval training (HIIT) on stationary bikes is particularly effective for calorie burning.

Rowing Machine The rowing machine offers a full-body workout, engaging the legs, core, and upper body while boosting heart rate. It is excellent for building endurance and burning fat.

Stair Climber This machine mimics the motion of climbing stairs, targeting the glutes, quads, and hamstrings. It's a great way to tone the lower body while improving heart health.

Jump Rope A classic yet highly effective cardio exercise, jumping rope improves agility, coordination, and stamina. It's also a calorie-burning powerhouse that requires minimal equipment.

High-Intensity Interval Training (HIIT) HIIT involves alternating between short bursts of intense exercise (like sprints or burpees) and recovery periods. It can be done on equipment like treadmills, bikes, or with bodyweight exercises.

Group Fitness Classes Classes like Zumba, spin, or dance-based cardio provide a fun way to work out while keeping your heart rate up. They are social and engaging, making it easier to stay motivated. Swimming Many gyms have pools where swimming laps can serve as an excellent low-impact cardio workout. It engages multiple muscle groups and improves lung capacity.

Battle Ropes This functional cardio workout strengthens the arms, shoulders, and core while elevating the heart rate. It’s an excellent option for interval training.

Sunday, January 19, 2025

Bench press table

Bench Press Exercise Explanation


The bench press is a fundamental exercise in strength training and bodybuilding, targeting the chest, shoulders, and triceps. It is a versatile exercise that helps build upper body strength and improve muscle mass. Here's a detailed explanation:

Setup and Equipment To perform a bench press, you'll need a flat bench, a barbell, and weight plates. You can also use dumbbells for variation. The exercise begins with the lifter lying flat on their back on the bench, ensuring their head, shoulders, and buttocks are in contact with the surface. Feet should be flat on the ground, positioned firmly to provide stability.

Grip and Bar Position Grip the barbell slightly wider than shoulder-width apart, ensuring a comfortable hold. Your palms should face forward, and your wrists should remain straight to avoid unnecessary strain. The bar should be positioned directly above your eyes when unracked.

Execution Unrack the Bar: Lift the barbell off the rack and extend your arms fully, keeping the bar steady above your chest. Lower the Bar: Slowly lower the barbell to your chest, maintaining control throughout the movement. Aim for the bar to touch the middle of your chest. Avoid bouncing the bar off your chest to prevent injury. Press the Bar: Push the barbell back up to the starting position by extending your arms. Engage your chest, shoulders, and triceps to drive the movement. Keep the bar path straight and controlled.

Breathing Proper breathing is crucial for optimal performance. Inhale as you lower the bar to your chest and exhale forcefully as you press it back up. Muscles Worked

The primary muscle targeted is the pectoralis major (chest), while the deltoids (shoulders) and triceps brachii (back of the arms) play a secondary role. Stabilizing muscles, including the lats and core, also contribute to the movement.

Tips for Safety and Effectiveness Use a spotter for heavy lifts to ensure safety. Warm up with lighter weights to prevent injury.

Keep your lower back slightly arched but avoid excessive arching. Progressively increase the weight over time to build strength. The bench press is a cornerstone exercise for building a strong, muscular upper body. Regular practice with proper form can yield impressive results, enhancing both strength and aesthetics.

Friday, January 17, 2025

leg exercises in gym

Leg Exercises in the Gym


Training your legs is crucial for building strength, improving athletic performance, and maintaining overall fitness. The leg muscles include the quadriceps, hamstrings, glutes, and calves, each contributing to lower body power and mobility. Below are some essential leg exercises commonly performed in the gym:

1. Squats Squats are the foundation of any leg workout. This compound movement targets the quadriceps, glutes, and hamstrings while engaging the core for stability. Variations include:

Barbell Squats: Place a barbell across your shoulders and squat down until your thighs are parallel to the floor. Goblet Squats: Hold a dumbbell or kettlebell close to your chest for added resistance.

2. Lunges Lunges improve balance and target the quadriceps, glutes, and hamstrings. Perform them by stepping one leg forward, lowering your body until both knees form 90-degree angles, and then returning to the starting position. Variations include walking lunges, reverse lunges, and lateral lunges.

3. Leg Press Using the leg press machine allows you to isolate your leg muscles while reducing the load on your lower back. Adjust the seat and foot placement to target specific muscles. Push the platform away from your body without locking your knees at the top.

4. Deadlifts Deadlifts are excellent for the hamstrings, glutes, and lower back. They also improve grip strength. Stand with your feet shoulder-width apart, hold a barbell, and lift it by extending your hips and knees while keeping your back straight. Romanian deadlifts focus more on the hamstrings.

5. Leg Curls and Extensions Leg Curl Machine: This isolates the hamstrings by flexing your knees against resistance. Leg Extension Machine: Target the quadriceps by extending your legs while seated.

6. Calf Raises To strengthen and define your calves, perform calf raises. Stand on the edge of a platform or use a machine to elevate your heels, hold, and slowly lower them back down.

Tips for an Effective Workout: Warm up before starting to prevent injuries. Use proper form to maximize results and avoid strain.

Incorporate progressive overload by gradually increasing weights. Stretch after workouts to improve flexibility and recovery. By consistently performing these exercises, you’ll develop stronger legs, enhance lower body endurance, and improve your overall fitness

Thursday, January 16, 2025

Fat-topic

How to Reduce Fat

Reducing body fat requires a combination of a balanced diet, regular physical activity, and Daily lifestyle #lifestyle changes. Here are some effective tips: 1. Adjust Your Diet Create a Caloric Deficit: Consume fewer # calories than you burn. Increase Protein Intake: Helps in building #muscle and #boosts #metabolism. Limit Sugary Foods and Drinks: Avoid processed #foods, #sugary drinks, and refined carbs. Eat Healthy Fats: # Incorporate sources like nuts,# seeds, #avocados, and olive oil in moderation. High-Fiber Foods: Include# vegetables, fruits, whole grains, and legumes to improve satiety.

2. Exercise Regularly #Cardio: Engage in activities like running, cycling, or swimming to burn calories. Strength Training: Builds muscle, which increases your resting metabolic rate.

High-Intensity Interval Training (HIIT): # Short bursts of intense #activity followed by rest can be very effective for fat loss. 3. Stay Hydrated Drink plenty of water# throughout the #day. It helps in #reducing appetite and increasing metabolism.

4. Get #Adequate Sleep Poor sleep can increase hunger hormones and reduce metabolism. Aim for 7-9 hours of quality sleep per night.

5. Manage Stress High stress levels can lead to overeating and #fat storage, #especially in the abdominal area. Practice stress management techniques like yoga, meditation, or deep breathing exercises.

6. Monitor Your Progress Keep track of your weight, measurements, and overall fitness #levels. Adjust your diet and exercise based on progress.

7. Avoid Shortcuts Avoid crash diets or extreme measures. Sustainable fat loss takes time and consistent effort. Would you like help designing a personalized fat-loss plan or tracking system?
<

Tuesday, January 14, 2025

abs exercise at home

abs exercises

ere are some effective abs exercises you can do at home without any equipment: 1. Crunches How to Do: Lie on your back with your knees bent and feet flat on the floor. Place your hands behind your head. Lift your shoulders off the ground using your core and lower back down. Reps: 15–20 per set. Target: Upper abs.

2. Plank How to Do: Get into a #push-up position with your elbows resting on the ground. Keep your body in a straight line from head to heels. Hold the position. Duration: Start with 20–30 seconds and gradually increase. Target: Entire core,# including abs, #lower back, and #shoulders..

3. Bicycle Crunches How to Do: Lie on your back and place your hands behind your head. Bring your knees to a #90-degree angle. Alternate #touching your left elbow to your right knee and your right elbow to your left knee in a # pedaling motion. Reps: 15–20 per side. Target: Obliques and #upper abs..

4. Leg Raises How to Do: Lie flat on your back with your legs straight. Lift your legs up until they are perpendicular to the floor, then slowly lower them back down without letting them touch the ground. Reps: 10–15. Target: Lower abs..

5. Russian Twists How to Do: Sit on the ground with your knees bent and feet slightly off the floor. Lean back slightly and twist your torso to the left and then to the right, touching the ground on each side. Reps: 20 (10 per side). Target: Obliques..

6. Mountain Climbers How to Do:

Monday, January 13, 2025

exercise for back

Exercise for a Healthy Back: A Foundation for Well-being

The human back is a marvel of anatomical engineering, composed of bones, muscles, ligaments, and nerves working together to support our body, enable movement, and protect the spinal cord. However, in today's sedentary lifestyle, our backs bear the brunt of prolonged sitting, poor posture, and inadequate physical activity. Regular exercise tailored to strengthen and support the back is not just a fitness goal; it is an essential practice for maintaining overall health and well-being.


Deadlift exercise

The Importance of Back Exercises

The back forms the core structural support of the body. The spine, with its intricate network of vertebrae, discs, and muscles, provides flexibility and strength. However, without proper care, this intricate system can become prone to injuries, pain, and dysfunction. Exercises aimed at strengthening the back play a critical role in improving posture, enhancing mobility, and reducing the risk of chronic back pain or conditions like herniated discs and sciatica.


Back exercise
Moreover, a strong back contributes to better physical performance in daily activities and sports. It supports the upper body, aids in lifting and bending, and acts as a stabilizing force for the entire body. Incorporating back-focused exercises into your routine is not just about alleviating or preventing pain; it is about fostering a resilient and agile body capable of withstanding life's demands.

Types of Back Exercises Back exercises can be broadly categorized into stretching and strengthening exercises. Both types are essential for maintaining a healthy back.

Stretching Exercises:

These exercises focus on improving flexibility and relieving tension in the back muscles. Examples include:

Child’s Pose: A gentle yoga posture that stretches the lower back. Cat-Cow Stretch: Alternating between arching and rounding the back to enhance spinal mobility. Seated Spinal Twist: Helps in stretching the upper and lower back while improving spinal rotation. Strengthening Exercises: These target the core and back muscles to build support and stability. Examples include:

Bridge Pose: Strengthens the lower back, glutes, and hamstrings. Superman Pose: Engages the upper and lower back muscles.

Planks: A core-strengthening exercise that indirectly supports the back. Incorporating Exercise into Daily Life

Consistency is key to reaping the benefits of back exercises. Start with a simple routine and gradually increase intensity as your back becomes stronger. Incorporate exercises into your daily schedule, whether as part of a morning stretch routine or during breaks from work. It is also essential to balance back exercises with overall physical activity, including aerobic exercises like walking or swimming, which promote overall spinal health.

Tips for Safe Back Exercise

Warm-Up and Cool Down: Prepare your body with a warm-up and relax with a cool-down to prevent injuries. Focus on Form: Perform exercises with proper alignment to avoid strain or injury. Listen to Your Body: If you experience pain, stop and consult a healthcare professional. Stay Consistent: Gradual progress is better than overexertion.

Conclusion

A healthy back is vital for a vibrant and active life. Regular back exercises not only alleviate pain but also enhance posture, mobility, and overall physical resilience. In a world where back pain is increasingly common, taking proactive steps to care for your back through exercise is a gift to yourself—a foundation for a healthier, happier, and more productive life.

Saturday, January 11, 2025

what are the cardio exercises

Cyclling

#Cycling# is a low-impact, aerobic exercise that provides numerous health benefits, making it suitable for people of all ages and fitness levels. Here's a detailed explanation of cycling exercise:

1. Types of Cycling Outdoor Cycling: Riding a bicycle on roads, trails, or mountains. Indoor Cycling: Using a stationary bike or participating in a spin class.

Mountain Biking: Cycling on off-road terrains with specialized bikes. Commuter Cycling: Using a bicycle for transportation purposes.

Road Cycling: Riding at higher speeds on paved roads for fitness or sport.

hai Benefits of Cycling

Physical Benefits Cardiovascular Health: Cycling strengthens the heart, improves blood circulation, and reduces the risk of cardiovascular diseases. Weight Management: Helps burn calories and reduce body fat. Muscle Toning: Strengthens the lower body muscles, including the calves, thighs, and glutes. Improves Joint Mobility: Low-impact nature reduces stress on joints, making it ideal for people with arthritis. Boosts Stamina and Endurance: Improves overall aerobic capacity.

Cardio exercises are activities that increase your heart rate and improve cardiovascular health. Common examples include:
Running or Jogging: Great for overall stamina and fat burning. Walking: Low-impact exercise suitable for all fitness levels.

Cycling: Boosts leg strength and heart health. Swimming: Full-body workout, easy on joints. Jump Rope: Improves coordination and burns calories quickly.
Dancing: Fun way to stay active while improving endurance.

Friday, January 10, 2025

headstand exercise benefits

Headstand exercise, also known as Sirsasana, is considered the "king of yoga poses" because of its numerous benefits for the body and mind. Here are some key benefits: 1. Improves Blood Circulation

Inverts the body, allowing blood to flow to the brain and upper body, which increases oxygen supply and nutrients to the brain. Improves skin health by enhancing blood flow to the face. 2. Strengthens Core and Upper Body

Engages the abdominal, shoulder, and arm muscles to maintain balance. Builds strength and stability in the upper body.

3. Boosts Brain Function Enhances focus, concentration, and memory by increasing blood flow to the brain.

Stimulates the pituitary and pineal glands, which regulate hormonal balance. 4. Reduces Stress and Anxiety

Calms the nervous system and helps relieve stress. Increases the production of endorphins, improving mood.

5. Improves Digestion Inversion helps detoxify the body by promoting blood flow to digestive organs. Relieves constipation and improves overall digestion.

6. Promotes Healthy Spine Decompresses the spine and relieves pressure on the lower back. Improves posture and spinal alignment. 7. Enhances Lymphatic Drainage

Gravity aids in draining lymphatic fluid from the lower body, boosting the immune system. 8. Benefits the Cardiovascular System

Reduces strain on the heart by allowing gravity to assist blood flow back to the heart. Improves overall heart health.

9. Boosts Confidence and Mental Strength Overcoming the fear of balancing on your head improves mental resilience and self-confidence. 10. Improves Hormonal Balance

Stimulates endocrine glands, including the thyroid and adrenal glands, promoting hormonal balance. Caution

While headstands have many benefits, they should be practiced with proper technique and under guidance, especially for beginners. Avoid if you have: High blood pressure

Neck or back injuries Glaucoma or other eye conditions

Heart conditions

Tuesday, January 7, 2025

perfect pushup(one hand)

One hand pushup is strengthy pushup .majority the people who build his strength from a particular time and practice on it. can complete this pushup.

A perfect one-hand pushup is an impressive feat of strength, balance, and control. Here’s how you can master it step by step: Preparation Build a Foundation: Make sure you can perform at least 20-30 standard pushups with perfect form. Focus on core strength, shoulder stability, and wrist flexibility. Strengthen Supporting Muscles: Include exercises like planks, side planks, and unilateral (one-sided) strength training to prepare your core and arms.

Progress Gradually: Practice uneven pushups by placing one hand on a slightly raised surface (e.g., a yoga block) to shift more weight to one side. Step-by-Step Guide Start with Proper Setup:

Place your feet slightly wider than shoulder-width apart for better balance. Position your supporting hand directly under your shoulder. Tuck your non-working arm behind your back or across your chest. Engage Your Core:

Keep your core tight to maintain stability and prevent your hips from sagging or twisting. Engage your glutes and quads to create a strong base. Lower Yourself with Control:

Slowly bend your supporting arm, keeping your elbow close to your body. Lower your chest toward the ground while keeping your body straight like a plank. Pause at the Bottom:

Stop just before your chest touches the ground. Maintain tension in your core and avoid collapsing. Push Back Up:

Press through your palm to extend your arm and return to the starting position. Exhale as you push up and keep your movement controlled. Tips for Success

Start on an Incline: Practice on a higher surface like a sturdy bench or a wall before moving to the floor. Use a Mirror or Video: Check your form to ensure your body stays aligned and doesn’t twist. Be Patient: This move takes time and consistent practice to master. Progress at your own pace.

Common Mistakes to Avoid Letting your hips sag or twist. Flaring your elbow out too far, which can strain your shoulder. Rushing through the movement without control.

Friday, January 3, 2025

bench press set (pre set)

he flat bench press is a cornerstone exercise in strength training, widely regarded as one of the most effective movements for building upper body strength, particularly in the chest, shoulders, and triceps. This compound exercise is performed on a flat bench using a barbell or dumbbells and is a staple in bodybuilding, powerlifting, and general fitness routines.

Muscles Worked The primary muscle targeted by the flat bench press is the pectoralis major, the large chest muscle that contributes to a strong and broad upper body. Secondary muscles involved include the anterior deltoids (front shoulders) and the triceps brachii, which assist in extending the elbows during the press. Additionally, stabilizing muscles such as the serratus anterior and rotator cuff are engaged to maintain proper form.
Benefits Strength and Size Development: The flat bench press is excellent for hypertrophy (muscle growth) and strength development, making it a fundamental exercise for athletes and fitness enthusiasts.
Functional Strength: The pressing motion mimics real-life activities, improving overall functional upper-body strength. Versatility: Variations like close-grip bench press or dumbbell bench press allow for targeting different muscle groups and adding variety to a workout routine.
Progressive Overload: The ability to increase weight progressively ensures consistent muscle growth and strength gains over time. How to Perform the Flat Bench Press
Setup: Lie flat on a bench with feet planted firmly on the ground. Position your body so your eyes are directly under the barbell. Grip the bar slightly wider than shoulder-width apart, ensuring wrists are straight and aligned with the forearms.


Unrack the Bar: Lift the bar off the rack, keeping your arms fully extended and the barbell directly above your shoulders. Lower the Bar: Inhale and slowly lower the barbell to your mid-chest, maintaining control throughout the descent. Ensure elbows are at a 45-degree angle relative to your torso to avoid shoulder strain.

Press Up: Exhale and push the barbell upward in a straight line until your arms are fully extended again. Avoid locking your elbows at the top to maintain tension in the muscles.

Rack the Bar: Once the set is complete, carefully guide the bar back to the rack. Common Mistakes

Improper Form: Arching the back excessively or lifting feet off the ground can lead to injury and reduce effectiveness. Uncontrolled Descent: Dropping the bar too quickly can cause strain or loss of control.
Neglecting Warm-Up: Not warming up properly increases the risk of muscle strain. Overloading Weight: Using too much weight compromises form and safety. Variations


Dumbbell Bench Press: Offers a greater range of motion and helps correct muscular imbalances. Incline/Decline Bench Press: Targets upper or lower parts of the chest. Paused Bench Press: Improves control and strength at the bottom of the movement.

Home

Fitness Hub Fitness Hub Home ...